Instant Air: A Beginner’s Guide to Portable Tire Inflators
A portable tire inflator is a small, battery-powered air compressor that allows you to conveniently check tire pressure and fill tires on the go. Portable tire inflators provide several benefits:
- Convenience – Easily inflate tires anytime, anywhere without finding a service station. Often small enough to keep in your vehicle.
- Versatility – Most models can inflate car, bike, and sports equipment tires. Some can also be used for air mattresses, balls, and pool floats.
- Emergency readiness – Quickly inflate a flat to get you back on the road or safely to a tire shop. Helpful in remote locations.
- Accuracy – Built-in pressure gauges allow precise inflation to the recommended PSI for your tires. Prevent under or over-inflation.
There are three main types of portable tire inflators:
- 12V cigarette lighter inflators – Powered via vehicle’s 12V outlet. Must be near car to operate. Most affordable option.
- Rechargeable battery inflators – Can be used anywhere with fully charged built-in batteries. Most versatile.
- Compressed air inflators – Use compressed air canisters as the inflation source. No batteries needed. Limited run time.
Safety Precautions
Using a portable tire inflator requires taking some basic safety precautions. Proper setup and monitoring during use can prevent accidents or injuries.
- Place the inflator on a flat, stable surface when in use. Don’t let the unit wobble or tip over, which could damage the inflator or cause the hose to pull loose.
- Always turn the inflator off and unplug it before attaching the hose to the tire valve stem. Attempting to attach the hose while the unit is running could lead to over inflation.
- Check tire sidewalls for maximum pressure rating and do not exceed it. Overinflating a tire can cause it to rupture or explode. Monitor the pressure gauge closely.
- Inflate tires gradually, occasionally stopping to check for leaks. If you hear air hissing from the tire or see the gauge dropping, stop and check for punctures.
- Do not leave an inflator unattended while in use. Stay nearby to monitor pressure levels and listen for changes in inflator operation.
- Keep bystanders and body parts away from the inflator during operation. Rapid air release could cause injuries.
- Use caution around moving parts like fans and valves. Keep hands, hair, and loose clothing away.
Following basic safety measures will allow you to safely inflate tires with a portable compressor. Take your time, monitor tire pressure, and shut off the inflator if issues arise. Proper use will prevent accidents and equipment damage.
Preparing the Tire
Before using the portable tire inflator, you’ll need to properly prepare the tire. This involves a few simple steps:
- Inspect the tire – Take a close look at the tire and check for any punctures, leaks, or damage. Don’t attempt to inflate a damaged tire.
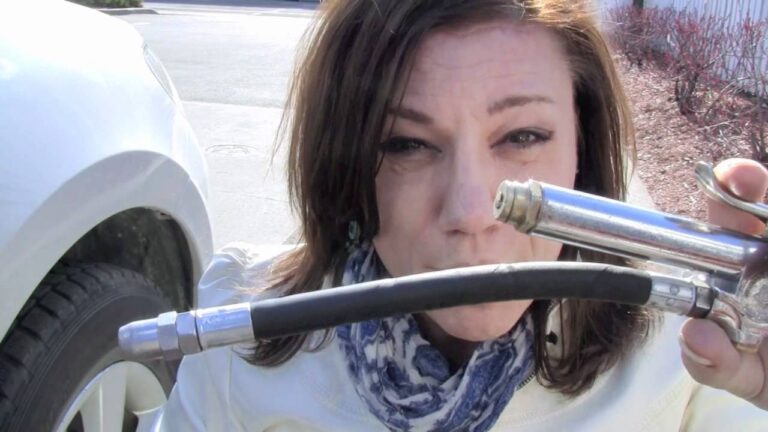
- Locate the valve stem – The valve stem is where you’ll connect the inflator. It’s a short, hollow tube normally located at about the 6 o’clock position on the wheel. The valve stem has a valve stem cap that protects it.
- Remove valve stem cap – Unscrew and remove the valve stem cap. This exposes the valve core inside the stem where you’ll attach the inflator chuck. Keep the cap in a safe place so you can replace it when done inflating.
Properly preparing the tire makes using a portable inflator quicker, easier, and safer. Always start by inspecting the tire closely and locating the valve stem before connecting your inflator. Removing any caps or covers provides access to inflate the tire.
Using the Inflator
Attaching the inflator to the valve stem of the tire is a crucial first step in the inflation process.
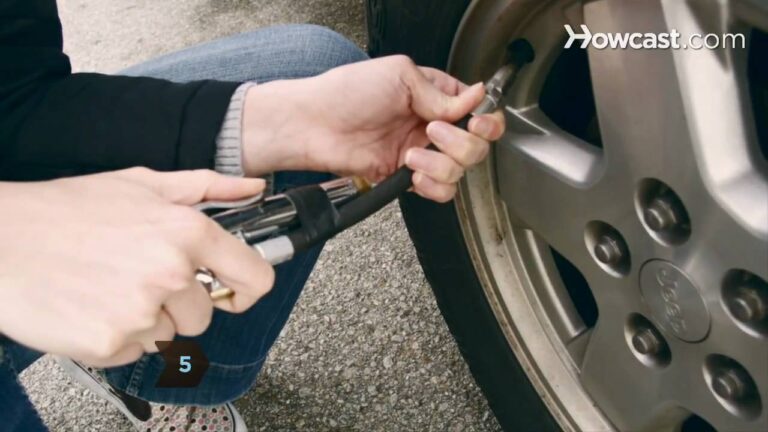
First, locate the valve stem on the tire you wish to inflate. The valve stem is a short, hollow tube with a threaded nozzle.
Next, take the air chuck (the connector piece at the end of the inflator hose) and press it firmly onto the valve stem. You’ll likely hear a “hiss” of air as the seal is made. Screw the chuck clockwise to tighten and secure the connection.
With the inflator now attached, plug the power cord into an appropriate outlet to provide power to the unit.
Look for the power button on the inflator and press it to turn it on. The unit may have lights that illuminate or make sounds to indicate it is powered up.
Now it’s time to set the target pressure you want the tire inflated to. Consult your vehicle’s owner’s manual or the tire sidewall to determine the recommended PSI (pounds per square inch) for that specific tire.
On the inflator, locate the pressure gauge and adjustment buttons. Use the buttons to set the desired pressure level for that tire.
Once the target PSI is set, press the start or inflate button to begin the inflation process. The inflator will automatically pump air into the tire until it reaches the preset pressure level and then automatically shut off.
It’s best not to remove the inflator or disconnect the air chuck until the target pressure has been reached and the inflator stops on its own. This ensures maximum airflow and proper inflation.
When the inflator shuts off, disconnect the air chuck and recheck the tire pressure with an accurate tire pressure gauge to confirm the correct PSI was reached.
Checking Pressure
Using a portable tire inflator allows you to check and adjust your tire pressure as needed, which is an important part of tire maintenance. Here are some tips for checking tire pressure with a portable inflator:
Before checking the pressure, make sure your tires are cool – meaning they haven’t been driven for at least 3 hours. The temperature of the tires affects the pressure reading.
Use a high quality, reliable tire pressure gauge to check the pressure. Many portable inflators come with a built-in pressure gauge, which makes checking easy.
Compare the measured tire pressure to the recommended PSI level. This number is usually found on a sticker inside the driver’s side door jamb or in the owner’s manual.
If the measured pressure is below the recommended PSI, add more air using the inflator. Most experts recommend keeping tires inflated to the maximum PSI listed on the sidewall, not the lower “recommended” PSI. Properly inflated tires last longer and perform better.
If the tires are over-inflated, gently press the bleed valve or release air by loosening the connector between the inflator and valve stem. Take some air out until reaching the proper PSI.
Re-check the tires with the gauge after inflating or deflating to get an accurate reading. The pressure may drop slightly after removing the inflator.
Repeat this process for all tires, keeping in mind that each may have a different recommended PSI. It’s important to measure and adjust each tire individually.
Checking tire pressure regularly and keeping them properly inflated will save money on fuel, extend the life of your tires, and enhance handling and braking. Portable inflators make it a quick and easy task.
Adding Sealant
Adding a tire sealant is an optional but highly recommended step when using a portable tire inflator. Tire sealants provide additional protection against flats and slow leaks by sealing punctures in the tread.
Benefits of Tire Sealant
- Seals small punctures and slow leaks as they occur. This prevents the tire from going flat immediately.
- Allows you to drive safely to a tire shop. Most sealants provide enough sealing capability to drive up to 50 miles with a 1/4 inch puncture.
- Reduces the need to stop and change a flat tire yourself.
- Minimizes damage to the tire from driving on an underinflated or flat tire.
Recommended Tire Sealants
Slime and Fix-A-Flat are two top rated tire sealants for use in portable inflators. Both sealants are non-toxic, non-flammable, and safe for TPMS tire sensors.
- Slime sealant contains fibers that interweave to seal punctures up to 1/4 inch. It works well in inflators that have an inline sealant injection system.
- Fix-A-Flat contains rubber particles that coagulate to quickly seal punctures up to 1/8 inch. It comes in aerosol cans and is easy to inject through inflator valves.
Adding Sealant via the Inflator
Follow these steps to add sealant through your portable inflator:
- Remove the inflator hose from the tire’s valve stem.
- Attach the sealant canister to the inflator’s inlet.
- Turn on the inflator so it pulls sealant from the canister and into the hose.
- When the canister is empty, disconnect it from the inflator.
- Reattach the inflator hose to the tire valve stem.
- Turn on the inflator and add air to the recommended pressure.
The inflator will circulate sealant into the tire as it inflates. Drive a short distance to allow the sealant to fully coat the interior. Your tires are now protected against flats and slow leaks.
Maintenance
Proper maintenance of your portable tire inflator will ensure it continues working properly for a long time. Here are some key maintenance tips:
Cleaning after use
- Wipe down the inflator with a damp cloth to remove any dirt or debris after each use. Don’t use harsh chemicals or abrasives that could damage the inflator.
- Use compressed air to blow out any dust or particles, especially around the air intake and pressure gauge.
- Check the air filter and wash or replace it if dirty. A clogged filter will reduce performance.
Storing properly
- Allow the inflator to fully cool before storing it away. Never store it while still hot.
- Store the inflator in a clean, dry location like a garage or shed. Avoid exposing it to extreme temperatures or moisture.
- Wrap the power cord loosely around the inflator for tidy storage. Don’t wrap the cord too tightly.
- Drain any unused sealant from the inflator according to the manufacturer’s instructions to avoid clogs.
Replacing parts/fluids
- Check inflation hoses and power cords for cracks or damage and replace if needed. Don’t try to patch air hoses.
- Replace the air filter at recommended intervals or when visibly dirty. Check the manual.
- Refill or replace empty sealant bottles as needed for puncture repair. Use only compatible sealant.
- Change the oil on oil-lubricated inflators per the manufacturer’s recommendations.
Following these maintenance tips will keep a portable tire inflator in proper working condition for years of reliable service inflating tires quickly whenever needed.
Troubleshooting
Some common issues when using a portable tire inflator include:
No Power
- Check that the inflator is fully charged or plugged into a working power source.
- Try a different power source or outlet.
- Check for loose battery terminals or damaged cords.
- Test the battery with a voltmeter to confirm sufficient charge.
- Ensure any switches are turned on and properly connected.
Air Leaking
- Check valve stem for cracks or damage, and make sure cap is tight.
- Examine inflator hose connections for leaks, detach and reattach securely.
- Remove tire, check for punctures, and patch/replace if needed.
- Try adding soapy water to areas to bubble and identify leaks.
- Make sure inflator head is properly seated on valve stem.
Uneven Inflation
- Check valve stem for obstructions preventing air flow.
- Detach and reattach inflator head to ensure proper seal.
- Inflate tire in short bursts, regularly checking pressure.
- Avoid moving the tire or inflator head during inflation.
- Make sure tire is rotated smoothly during inflation.
Overinflation
- Monitor pressure gauge regularly during inflation.
- Bleed air slowly using inflator release valve if over target pressure.
- Do not leave inflator running unattended for long periods.
- Adjust inflator settings to stop automatically at correct pressure.
- Check tire sidewall for maximum pressure rating and do not exceed.
Safety Features
Portable tire inflators have some key safety features to be aware of before use. This ensures proper operation and prevents accidents or injuries.
- Auto Shut Off – Most portable inflators will automatically shut off when target pressure is reached or if left running too long unattended. This prevents over-inflation which can cause a tire to explode. It also saves electricity.
- Pressure Gauges – Quality inflators have easy-to-read gauges that display tire pressure in PSI as you inflate. This allows you to precisely hit the manufacturer’s recommended tire pressure. Analog gauges may be more durable than digital readouts.
- Heavy Duty Cords – Since you’ll be using the inflator outdoors, it should have a durable, thick power cord that resists cuts and abrasions. Make sure any extensions cords used are rated for outdoor use. The hose connecting to the tire valve should be flexible and sturdy.
Proper use of an inflator requires reading the owner’s manual to understand all the safety features. With practice, portable inflators can safely and quickly get you back on the road. Regular maintenance like cleaning air filters will also improve performance and safety.
Buying Guide
When purchasing a portable tire inflator, there are several key factors to consider:
Cord Length
- Choose an inflator with a cord long enough to reach all four tires on your vehicle. Most inflators have a cord 6-10 feet long. Larger vehicles may need one with a longer cord.
- Make sure the cord is durable and flexible enough to maneuver around the vehicle. Avoid cords that seem flimsy.
- Consider an inflator with an extension cord if you need extra reach.
Tank Capacity
- Tank capacity relates to how much air the inflator can hold and deliver. Typical capacities are 0.5-1 gallon.
- Higher tank capacities allow you to inflate more tires before needing to refill the tank.
- Large vehicle tires require more air volume and may need a higher capacity.
Added Features
- Built-in pressure gauges let you precisely measure PSI. Models with digital gauges are most accurate.
- Auto shut-off turns the inflator off automatically when the target PSI is reached. This prevents overinflation.
- Portable LED lights allow nighttime use. Make sure they are bright enough to see the tire valve stem.
- Battery clamps can be used to jump start your vehicle if the battery dies.
Budget
- Basic inflators start around $20-30 but may lack convenience features.
- With more features, expect to pay $40-100+ for higher-end models.
- Determine which features are must-haves vs. nice-to-haves when setting your budget.