How To Inflate A Bike Tire With A Presta Valve
Flat tire? It’s happened to the best of us! Knowing how to properly air a bike tire with a Presta valve is a crucial skill for any cyclist. This guide will walk you through the process step-by-step, explaining everything you need to know, so you can be back on the road (or trail) in no time. You’ll learn to confidently inflate your tires and avoid common mistakes, saving you time and frustration. This guide also covers troubleshooting common issues.
Understanding Presta Valves
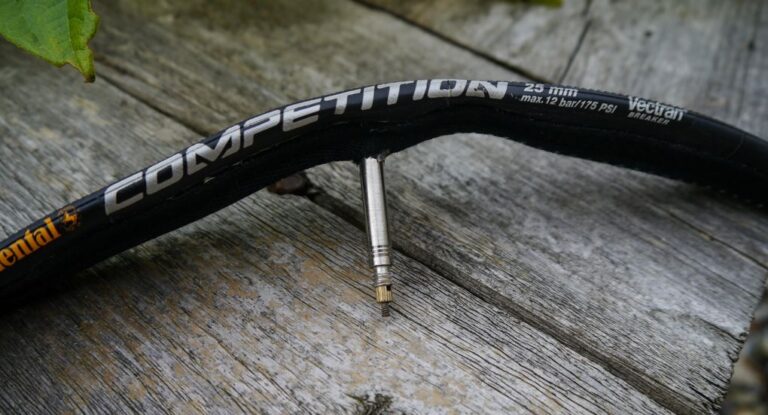
Presta valves, also known as French valves, are commonly found on higher-end bikes and are known for their slim profile. This section will detail their structure and how they differ from Schrader valves, which you might find on cars or cheaper bikes. We will cover the valve’s components, their function, and how they enable efficient inflation.
Presta Valve Components
- Valve Stem: The long, thin part of the valve that extends from the tire. This is where you’ll attach the pump.
- Locking Nut: A small nut at the top of the valve stem. Unscrewing this unlocks the valve.
- Valve Core: The internal component that controls the flow of air. This is crucial for inflation and is the most common point of failure.
Each component plays a vital role. The valve stem acts as the conduit for air, the locking nut provides an air-tight seal, and the valve core ensures the air doesn’t escape until you attach a pump. Understanding these parts is key to proper inflation.
How to Air a Bike Tire with a Presta Valve
This section provides a clear, step-by-step guide on how to successfully inflate a bike tire using a Presta valve. We’ll cover proper pump attachment and inflation techniques to ensure your tires are pumped to the correct pressure. We’ll address potential issues and offer solutions.
Step-by-Step Inflation
- Unlock the Valve: Unscrew the small locking nut at the top of the Presta valve counter-clockwise about half a turn.
- Attach the Pump: Firmly press the pump head onto the valve stem. Ensure a tight seal. If you are using a floor pump that is fitted with a Presta chuck ensure that the chuck is properly secured over the valve stem before inflating the tire.
- Inflate the Tire: Pump air into the tire until it reaches the recommended pressure (printed on the tire sidewall). This is crucial for optimal performance and safety. Use a gauge to monitor the pressure and don’t over inflate the tire.
- Lock the Valve: Once the tire is inflated to the correct pressure, tighten the locking nut.
Remember, it’s important to check the tire’s sidewall for the recommended PSI range to prevent overinflation or underinflation. Overinflation can cause premature tire wear and increased risk of pinch flats, while underinflation reduces rolling efficiency and impacts handling.
Troubleshooting Common Problems
This section addresses typical issues encountered when inflating Presta valves, including valve core removal, pump compatibility, and leakage problems. We’ll offer solutions and preventive measures to ensure a smooth inflation process each time.
Pump Compatibility
- Floor pumps vs. hand pumps: Floor pumps usually have a Presta attachment, allowing direct inflation. Hand pumps often need an adapter, and the best ones include both Presta and Schrader valve attachments. Without this, inflation is impossible.
- Pump head issues: If your pump head isn’t creating a good seal with the valve, air will leak. Check for any damage or debris preventing a solid connection.
- Adapter problems: Ensure that your adapter is properly fitted if you’re using a hand pump and a Presta valve. A loose or damaged adapter will cause leakage.
A well-fitting pump head, whether directly attached to the valve or via an adapter, ensures a proper seal and therefore a good inflation. Improper attachment causes air loss and frustrates the process. It’s easy to identify this error with air loss during pumping.
Fixing a Leaky Valve
A leaky Presta valve may be due to a loose locking nut or a damaged valve core. This section details how to effectively check for and address issues related to tire leakage.
- Check the Locking Nut: Ensure the locking nut is properly tightened. A loose nut is a common cause of leakage. Tighten it firmly, but avoid over-tightening, which could damage the valve.
- Check for valve core problems: If the valve still leaks after tightening the locking nut, the valve core itself might be faulty. You can remove the valve core and then try to reseat it. A replacement valve core might be necessary.
- Inspect for cracks: Carefully examine the valve stem for any small cracks or damage that might be allowing air to escape. Replace the valve stem or the tube in case of a crack.
A faulty valve core is often an overlooked problem. It is the small component inside the valve that seals the valve stem. Repairing this simple, usually inexpensive component often saves time, resources, and cost of replacement of the entire wheel. A new valve stem is sometimes required.
Maintaining Your Presta Valve
Regular maintenance will significantly extend the life of your Presta valves and ensure smooth inflation every time. This section outlines simple maintenance steps to prevent future problems.
Cleaning Your Valve
- Regular Cleaning: Wipe the valve and surrounding area with a damp cloth to remove dirt and grime that could interfere with sealing. This prevents the accumulation of debris that could cause poor sealing.
- Lubrication: A little lubrication on the threads of the locking nut can prevent seizing and make it easier to turn. Apply a light grease or lubricant specifically designed for bike parts.
- Inspect Regularly: Periodically check for any damage or wear and tear. Early detection allows for timely repairs, preventing more extensive problems.
Regular cleaning keeps the valve stem free of dirt and grit. Clean valves allow for tight seals and prevent premature wear of the valve. Maintaining a clean and lubricated valve guarantees smooth inflation and prolongs its useful life.
Common Myths about Presta Valves
Several misconceptions surround Presta valves. This section addresses common myths and clarifies the facts for proper valve use and maintenance.
Myth 1: Presta valves are difficult to use.
While initially they may seem more complex than Schrader valves, with a little practice, inflating a tire with a Presta valve becomes just as easy. The key is understanding the valve’s components and how they work together.
Myth 2: Presta valves are more prone to failure.
The reliability of a Presta valve is equal to any other type of valve, provided that it is properly maintained and used. Damage usually results from misuse or lack of maintenance.
Myth 3: You need a special pump for Presta valves.
While many floor pumps are designed specifically for Presta valves, many hand pumps can be used with an adapter, making inflation possible with most pumps.
FAQ
How much air pressure should I put in my tires?
The recommended tire pressure is printed on the tire sidewall. It’s crucial to adhere to this range for optimal performance and safety. Overinflation can lead to flats, while underinflation reduces efficiency and comfort.
What should I do if my Presta valve is leaking?
First, tighten the locking nut. If the leak persists, the valve core might be damaged and needs replacement. If the leak comes from the valve stem itself, you may need a new tube.
What is the difference between a Presta and Schrader valve?
Presta valves are slimmer and generally found on higher-end bikes. Schrader valves, found on cars and some lower-end bikes, have a larger diameter and are usually easier to inflate, but are less efficient at holding air.
Can I use a Schrader pump on a Presta valve?
You can’t directly use a Schrader pump on a Presta valve. You’ll need a Presta adapter. Most pumps readily have attachments for both types of valves.
How often should I check my tire pressure?
It’s recommended to check your tire pressure before every ride. Temperature changes can affect air pressure, potentially leading to underinflation. Regular checks prevent this.
Why is my tire still soft after pumping?
This may indicate a slow leak, a faulty valve core, or a damaged tube. Check the valve for leaks, and inspect the inner tube for punctures.
What do I do if the valve core is stuck?
Use a valve core removal tool to carefully remove the core. Sometimes, a little bit of lubricant can loosen a stuck valve core. Clean and reseat or replace it after cleaning.
Final Thoughts
Mastering the art of airing a bike tire with a Presta valve empowers you to maintain your bike efficiently and safely. Remember the steps: unlock, attach, inflate, and lock. Regular maintenance, including cleaning and lubrication, will prevent future problems. By understanding the valve’s components and troubleshooting common issues, you’ll be equipped to tackle flat tires with confidence, maximizing your enjoyment of cycling. So, grab your pump and keep those tires inflated!


