5 Top Ways to Inflate a Tubeless Tire: Reviews & Ultimate Guide
Getting a tubeless tire to seat properly can feel like a dark art sometimes, right? That satisfying “POP!” sound as the bead locks into place is pure music to a cyclist’s ears, but reaching that point isn’t always straightforward. Whether you’re a seasoned mechanic or a weekend warrior, finding the best way to inflate a tubeless tire can save you a ton of frustration and time.
Tubeless tires offer fantastic benefits, from puncture resistance to a smoother ride at lower pressures. However, their unique design requires a sudden burst of air to push the tire’s beads firmly against the rim, creating an airtight seal. A standard floor pump often just doesn’t cut it, leaving many riders scratching their heads.
In this guide, we’re diving deep into the top solutions that make tubeless tire inflation a breeze. We’ll review 5 fantastic products, breaking down what makes them tick and who they’re best for. So, let’s air out the confusion and find the perfect tool for your tubeless setup!
Understanding Tubeless Tire Inflation Challenges
The main hurdle with tubeless tires is getting the tire bead to seal against the rim. Unlike traditional tires with tubes, a tubeless tire needs that initial, rapid volume of air to “pop” the beads into place. Without it, the air just escapes through the gap, and your tire remains stubbornly flat. This is where specialized tools come in, providing the high-volume, high-pressure blast needed to make that connection.
Our Top 5 Picks for Inflating Tubeless Tires
We’ve rounded up a selection of products that represent the best way to inflate a tubeless tire, covering various scenarios from individual bike setups to multi-vehicle off-roading.
Airshot Tubeless Tire Inflator 1.15l
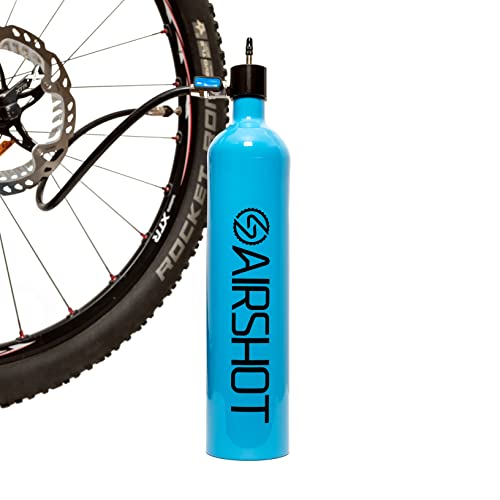
The Airshot Tubeless Tire Inflator is a game-changer for anyone tired of wrestling with stubborn tubeless beads or wasting CO2 cartridges. This compact, high-pressure air reservoir works seamlessly with your existing floor pump, transforming it into a powerful tire booster. It’s designed to deliver that crucial blast of air needed to seat your tubeless tires quickly and efficiently, making frustrating setup moments a thing of the past. It’s truly a contender for the best way to inflate a tubeless tire for cycling enthusiasts.
Key Features:
– Compatible with all tire sizes: 26″, 27.5″, 27.5+”, 29″, 29+”, MTB, road, cyclocross, and fat bikes.
– Designed to work with your existing bicycle floor pump, eliminating CO2 waste.
– Tested pressure up to 160psi (11atm) for reliable seating.
– Presta valve compatible.
– Portable and small size for easy storage and transport.
– Holds enough air to seat tires every time.
Pros:
– Environmentally friendly, no CO2 cartridges needed.
– Cost-effective as it uses your current floor pump.
– Highly portable for trailside fixes or race day.
– Delivers a consistent and powerful air burst.
– Durable and safe construction.
Cons:
– Requires a separate floor pump (not an all-in-one solution).
– May require some initial pumping to fill the reservoir.
User Impressions:
Cyclists rave about the Airshot’s simplicity and effectiveness. Many describe it as the missing link for their tubeless setups, making tire changes and sealant refreshes a breeze. Users appreciate its robust build quality and the peace of mind it offers, knowing they can seat a tire without needing a trip to the bike shop or relying on a bulky air compressor.
Tubeless Tire Inflator 1.1L- Tubeless Bike Pump Max160 Psi…

This 1.1L Tubeless Tire Inflator offers another excellent solution for seating tubeless bike tires with speed and precision. Much like the Airshot, it acts as an air reservoir, allowing you to quickly fill it with your standard floor pump and then release a high-pressure burst into your tire. It’s engineered for quick and easy inflation, ensuring the tire bead snaps into place with that satisfying ‘pop’ every time. Its wide compatibility and user-friendly design make it a standout choice for home mechanics and serious riders.
Key Features:
– Quick & easy tire inflation, seating tires in seconds.
– Connects to a conventional floor pump via an SV valve.
– Versatile attachment: direct screw-in (M6 x 0.8) for removed valve cores or Presta side for intact cores.
– Wide compatibility for all bike tire sizes: 26″, 27.5″, 27.5+”, 29″, 29+”, road, cyclocross, and fat bikes.
– Supports pressures up to 160 PSI (11 bar).
– Portable & convenient for trunk or workshop use.
– No need for bulky compressors or wasteful CO2 cartridges.
Pros:
– Extremely efficient for quick tubeless setup.
– Dual valve connection options for flexibility.
– Works with any standard bike pump, adding value.
– Compact and lightweight for superior portability.
– A great gift for any tubeless cyclist.
Cons:
– Requires careful connection to prevent air leaks.
– Not a standalone pump.
User Impressions:
Customers love this inflator for its straightforward operation and reliable performance. They often highlight how it eliminates the struggle of initial tubeless inflation, making it accessible even for those new to tubeless setups. The ability to use it with or without a valve core is frequently praised, offering excellent adaptability for various situations.
Rhino USA 4 Tire Inflation/Deflation System

Now, shifting gears (or tires, rather!), the Rhino USA 4 Tire Inflation/Deflation System is a completely different beast, designed for the off-road enthusiast with trucks, SUVs, and 4x4s. While the main keyword “best way to inflate a tubeless tire” often refers to bicycles, this system provides an incredibly efficient way to inflate four vehicle tubeless tires simultaneously and equalize their pressure. It’s an essential piece of off-road gear that simplifies managing tire pressure across multiple tires, whether airing up after a trail run or airing down for optimal traction.
Key Features:
– 2025 New Improved Version with an advanced 2-Way Slide Valve System.
– Automatically equalizes tire pressure in all four tires.
– Seamless PSI monitoring directly from the manifold with included Rhino USA Digital Gauge (1-150 psi).
– Integrated tire deflator for easy airing down.
– Essential off-road accessory for 4x4s, trucks, SUVs, side-by-sides.
Pros:
– Saves significant time and effort for multi-tire vehicles.
– Ensures precise and equal tire pressure across all tires.
– Durable and robust design suitable for harsh off-road conditions.
– Can both inflate and deflate with the same system.
– Digital gauge provides accurate readings.
Cons:
– Not suitable for bicycle tubeless tires.
– Requires an external air compressor (not included) for inflation.
– A significant investment compared to single-tire inflators.
User Impressions:
Off-roaders consistently praise the Rhino USA system for its sheer convenience and rugged build. They highlight how it transforms the tedious task of airing up or down into a quick, stress-free process. The ability to monitor and adjust PSI from a central manifold without bending down is a particular favorite feature, making it a must-have for serious overland and trail adventures.
[2025 Upgraded] LASFIT H4 Tire Inflation Deflation System
![[2025 Upgraded] LASFIT H4 Tire Inflation Deflation System...](https://m.media-amazon.com/images/I/41zaQiFZh9L._SL500_.jpg)
Like the Rhino USA system, the LASFIT H4 Tire Inflation Deflation System is a premium solution for owners of large vehicles, RVs, trucks, and 4x4s. This 2025 upgraded system is built for extreme conditions and offers unparalleled efficiency when it comes to managing tire pressure across multiple tubeless tires. Its robust construction and user-friendly design make it an ideal off-road accessory, ensuring your vehicle’s tires are always at the optimal pressure for any terrain.
Key Features:
– 2025 Upgraded 4 Tire System with patented “locking” valve and high-density rubber.
– Extended 200″ wheelbase compatibility (up from 125″) for wider vehicle support.
– Compatible with most compressors via a standard 1/4 NPT male connector (e.g., LASFIT, ARB, Smittybilt).
– High pressure resistant (300PSI max) with aerospace alloy and premium copper materials.
– Ultra rustproof and sturdy for all kinds of off-road scenes and climates.
– Backed by a 5-Year Warranty from LASFIT AIR.
Pros:
– Extremely durable and resistant to high pressure and harsh environments.
– Wide vehicle compatibility due to extended wheelbase.
– Excellent compressor compatibility.
– Patented “locking” valves prevent leaks and ensure efficiency.
– Industry-leading 5-year warranty offers great peace of mind.
Cons:
– Specific to multi-tire vehicle inflation, not bikes.
– Requires a separate air compressor.
– Premium price point reflects its robust features and warranty.
User Impressions:
Owners of heavy-duty vehicles and off-road enthusiasts are highly impressed by the LASFIT H4 system’s build quality and performance. The extended wheelbase and universal compressor compatibility are frequently mentioned as significant advantages. The 5-year warranty also instills confidence, making it a top choice for those who demand reliability and longevity from their gear.
G U P Kwiki Quick Fix Tire Sealant and Inflator
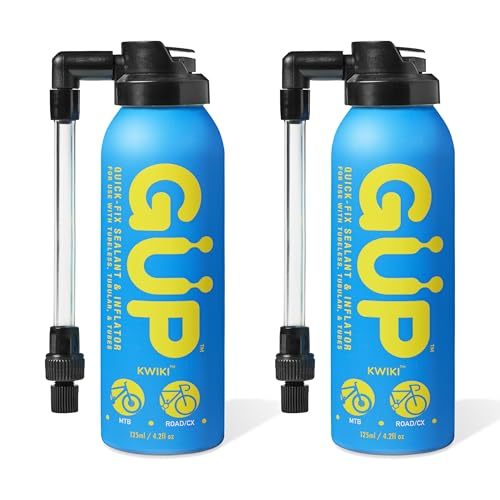
For quick, trailside emergencies, the GUP Kwiki Quick Fix Tire Sealant and Inflator is a lifesaver. This isn’t your primary workshop inflation tool, but rather a brilliant two-in-one solution that simultaneously seals punctures and inflates your tubeless (or even tubed) tire. It’s incredibly compact, making it an indispensable item for your saddle bag or backpack, offering an immediate fix to get you back riding without fuss. If you’re looking for an emergency best way to inflate a tubeless tire after a flat, this is it.
Key Features:
– Instant tire repair: seals punctures and inflates simultaneously.
– Easy push-button actuator, no need to remove the wheel.
– Versatile compatibility: mountain, road, cyclocross, gravel bikes, EMTB, EBIKES, wheelchairs, strollers.
– Hose top adapter fits both Schrader and Presta valves.
– Compact and lightweight (122g) for portability.
– Foaming action seals sidewall tears and reseats burped tires trailside.
– Effectively seals 6mm tubeless and 3mm tubed punctures.
– Recyclable aluminum canister, socially responsible company.
Pros:
– Provides an immediate fix for flats, saving time and hassle.
– Works for both tubeless and tubed tires.
– Universal valve compatibility.
– Extremely portable and easy to use on the go.
– Environmentally conscious packaging and company policies.
Cons:
– A temporary fix, not a permanent repair or initial setup tool.
– Limited inflation capacity compared to dedicated inflators.
– Single-use canister.
User Impressions:
Cyclists absolutely love the GUP Kwiki for its convenience and effectiveness in a pinch. It’s widely regarded as an essential “get out of jail free” card for flats, especially during races or long rides. Users appreciate how quickly it works and its compatibility with various bike types, making it a versatile emergency solution for almost any rider.
Choosing the Best Way to Inflate a Tubeless Tire for You
As you can see, the best way to inflate a tubeless tire really depends on what kind of tubeless tire you’re working with and your specific needs.
-
For Bicycle Tubeless Tires (Initial Setup & Maintenance): If you’re primarily concerned with seating bicycle tubeless tires at home or on the go, the Airshot Tubeless Tire Inflator and the Tubeless Tire Inflator 1.1L are your top contenders. They both leverage your existing floor pump to provide the crucial burst of air without the need for CO2 cartridges or an expensive air compressor. They’re eco-friendly, cost-effective, and highly reliable.
-
For Emergency Bicycle Tubeless Repairs: The G U P Kwiki Quick Fix Tire Sealant and Inflator is an absolute must-have for your saddle bag. It’s not for initial setup, but for quick, instant puncture repairs and inflation that get you rolling again in minutes.
-
For Multi-Vehicle Tubeless Tire Inflation (Off-Roading): If you’re managing tire pressure for trucks, SUVs, or 4x4s, the Rhino USA 4 Tire Inflation/Deflation System and the LASFIT H4 Tire Inflation Deflation System are in a league of their own. These robust systems streamline the process of airing up or down multiple large tubeless tires, offering precision and significant time savings for off-road adventures.
Consider your primary use case, your budget, and what other equipment you already own to make the most informed decision.
Frequently Asked Questions (FAQ)
Q1: Why are tubeless tires so hard to inflate initially?
A1: Tubeless tires require a sudden, high volume of air to push their beads tightly against the rim, creating an airtight seal. Without this rapid air blast, the air escapes through the gap between the tire and rim, preventing inflation.
Q2: Can I use a regular floor pump to inflate a tubeless tire?
A2: Sometimes, but often not for the initial seating. A standard floor pump typically can’t deliver the necessary volume of air quickly enough to “pop” the tire bead onto the rim. Dedicated tubeless inflators (boosters) or air compressors provide the required burst.
Q3: What PSI should I use for tubeless bike tires?
A3: Tubeless bike tires generally run at lower pressures than their tubed counterparts. The ideal PSI varies greatly depending on rider weight, tire width, riding conditions, and terrain. Many mountain bikers might run between 20-30 PSI, while road cyclists could be in the 50-80 PSI range. Always check your tire’s sidewall for its recommended min/max range.
Q4: Do I need sealant every time I inflate a tubeless tire?
A4: No, you only need to add sealant when you initially set up the tubeless tire or when the existing sealant dries out or gets used up (typically every 2-6 months, depending on conditions and sealant type). Once the tire is seated, you can inflate it normally as needed without adding more sealant.
Q5: What if my tubeless tire won’t seat even with a booster?
A5: There could be a few reasons:
– Insufficient sealant: Ensure you have enough sealant in the tire.
– Valve core still in: Remove the valve core for maximum airflow during initial inflation.
– Tire/rim incompatibility: Some combinations are just difficult.
– Damaged tire bead or rim tape: Inspect for any issues.
– Technique: Try bouncing the tire slightly or rotating it while inflating to help the sealant spread.
Q6: What’s the main difference between Presta and Schrader valves?
A6: Presta valves are typically found on road bikes and higher-end mountain bikes. They’re thinner, have a locknut at the top, and require a small screw to be opened before inflation. Schrader valves are wider, resemble car tire valves, and are common on entry-level bikes and children’s bikes. Most tubeless inflators are designed to be compatible with both or at least Presta valves.
Q7: How often should I check my tubeless tire pressure?
A7: Tubeless tires can lose air pressure more gradually than tubed tires, but it’s still a good habit to check your tire pressure before every ride, or at least once a week. Lower pressures provide better grip and comfort but can lead to “burping” or rim damage if too low.
Conclusion
Tackling tubeless tire inflation doesn’t have to be a headache. With the right tools, whether it’s a dedicated tubeless inflator for your bike, an emergency sealant solution, or an advanced system for your off-road vehicle, you can conquer the challenge with confidence. We hope this guide helps you find the best way to inflate a tubeless tire for your specific needs, ensuring you spend less time fumbling with pumps and more time enjoying the ride!